Are you looking for a cross-platform framework for building native mobile and desktop apps? If yes, then .NET MAUI is the right choice for it.
What is .NET MAUI?
.NET MAUI is a new way to build native mobile and desktop apps with C# and XAML. It’s a single framework that lets you write code once and run it on Android, iOS, macOS, and Windows.
Here are some of the benefits of using .NET MAUI:
- Cross-platform development: Using .NET MAUI, you can write a single codebase and run it on multiple platforms. This saves you time and effort, and it makes it easier to maintain your apps.
- Native performance: .NET MAUI apps are native apps, which means they look and feel like apps that were written specifically for each platform.
- One language, one framework: .NET MAUI uses C# and XAML, which are two of the most popular languages and frameworks for developing mobile and desktop apps.
Is .Net MAUI replacing Xamarin?
Microsoft is replacing Xamarin with .NET MAUI, a newer and more advanced cross-platform framework. .NET MAUI promises better performance, increased productivity, and a more streamlined developer experience than Xamarin. It is also built on top of .NET 6, which brings improved performance and features across all platforms.
Microsoft has announced that support for Xamarin will end on May 1, 2024. This means that after this date, Microsoft will no longer provide bug fixes, security updates, or new features for Xamarin. If you are still using Xamarin and plan to continue using it even after May 1, 2024, your apps may not be able to run on the latest versions of Android and iOS. This also means that you will not be able to deploy your apps to the Android and iOS app stores.
If you are currently using Xamarin, you should start planning to migrate to .NET MAUI. Microsoft has provided a roadmap and resources to help developers make the transition.
Now, let’s explore the comparison of architectures of MAUI and Xamarin.Forms.
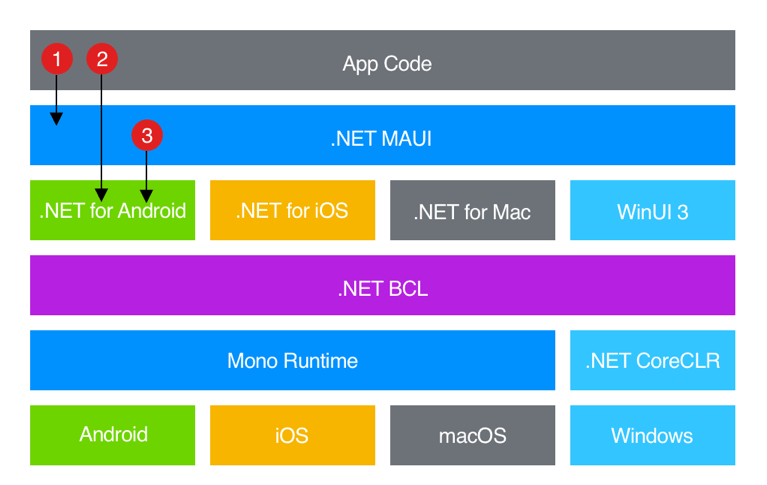
MAUI architecture
Source: https://learn.microsoft.com/en-us/xamarin/xamarin-forms/app-fundamentals/custom-renderer/listview
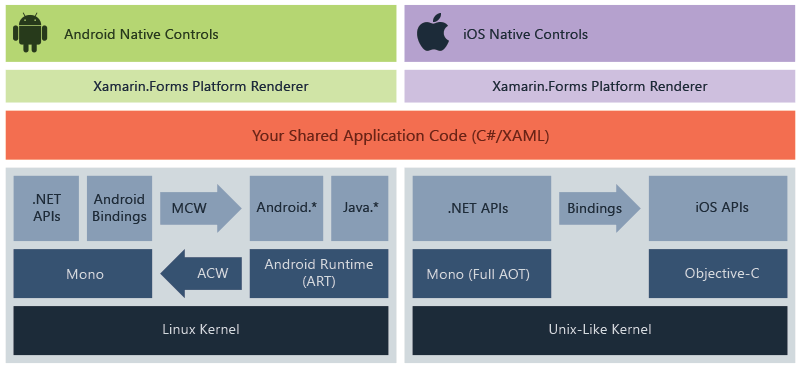
Xamarin architecture
Source: https://learn.microsoft.com/en-us/xamarin/xamarin-forms/app-fundamentals/custom-renderer/listview
As you can observe, the architecture appears somewhat similar, yet there are significant differences between the two.
Xamarin vs. .NET MAUI
| Xamarin | .NET MAUI |
|---|---|
| Xamarin supports .NET Framework to build and run apps | .NET MAUI supports the .NET CLI toolchain to build, run and publish .NET apps |
| Uses separate projects for each platform | Single project structure: each platform can be targeted using devices about to be deployed |
| Platform-dependent files and code are maintained under different projects | The platform-dependent files and code are maintained under platform folders and platform filename targets |
| Workarounds for accessing native resources | Direct access to native platform APIs |
Xamarin solution
The image below illustrates the solution for a Xamarin.Forms project. As you can see, the solution holds multiple projects based on platform.

MAUI solution
The image below presents the simplified solution for Microsoft MAUI. As you can see, there is no need to maintain separate projects for separate platforms which is quite easy to maintain now.
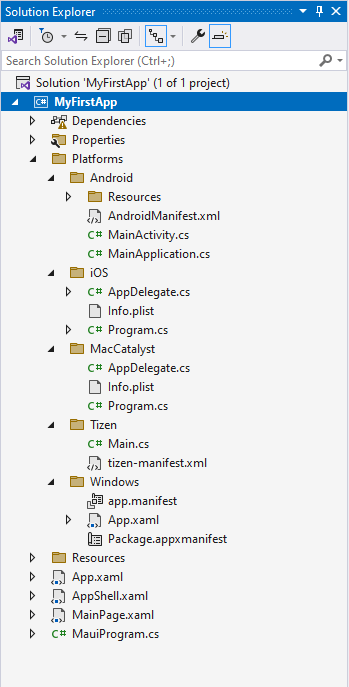
Also, since .NET MAUI is a simple project app, it works on a multitarget-based structure. An MAUI app contains a platforms folder, with subfolders representing platforms such as Android, iOS MacCatalyst, and Windows to target platform-specific code that starts the app on platforms. It can also be multitargeted based on your own file name. Generally, the naming pattern is to include the platform as an extension in the file name.
Platform support
| Xamarin | .NET MAUI |
|---|---|
Primary support
|
Primary support
|
Additional platform support
|
Additional platform support
|
Renderers vs Handlers
In Xamarin, controls are made with renderers. When developers want to customize native controls, they must use a custom renderer to do so. These cost heavily in terms of performance and app size.
On the other hand, .NET MAUI uses handler architecture that is very loosely coupled with native assembly. With a native platform, this results in a lightweight app with better performance. You can use renderers in MAUI if needed. Hence, even when porting Xamarin.Forms application, those existing custom renderer can be easily reused.
| Xamarin | .NET MAUI |
|---|---|
| Uses renderer architecture | Uses handler architecture as well |
| Tightly coupled with native controls | Loosely coupled with native controls |
| You cannot use handlers here | You can use renderers here if needed. You can reuse Xamarin.Forms custom renderer when porting |
Xamarin renderer architecture

Mostly, all the Xamarin developers are skilled at creating renderers for customizing controls as per different environments. So, let’s not get deeper into what exactly renderers are, instead let’s see how the code works.
Create custom entry
public class MyEntry : Entry
{

}
Create custom renderer on iOS
using Xamarin.Forms.Platform.iOS;

[assembly: ExportRenderer (typeof(MyEntry), typeof(MyEntryRenderer))]
namespace CustomRenderer.iOS
    {
        public class MyEntryRenderer : EntryRenderer
        {
            protected override void OnElementChanged(ElementChangedEventArgs<Entry> e)
            {
                base.OnElementChanged(e);

                if (Control != null)
                {
                    // do whatever you want to the UITextField here!
                    Control.BackgroundColor = UIColor.FromRGB(204, 153, 255);
                    Control.BorderStyle = UITextBorderStyle.Line;
                }
            }
        }
    }
Create custom renderer on Android
using Xamarin.Forms.Platform.Android;

[assembly: ExportRenderer(typeof(MyEntry), typeof(MyEntryRenderer))]
namespace CustomRenderer.Android
    {
        class MyEntryRenderer : EntryRenderer
        {
            public MyEntryRenderer(Context context) : base(context)
            {
            }

            protected override void OnElementChanged(ElementChangedEventArgs<Entry> e)
            {
                base.OnElementChanged(e);

                if (Control != null)
                {
                    Control.SetBackgroundColor(global::Android.Graphics.Color.LightGreen);
                }
            }
        }
    }
Consume the custom control
<ContentPage ...
xmlns:local="clr-namespace:CustomRenderer;assembly=CustomRenderer"
...>
    ...
    <local:MyEntry Text="In Shared Code" />
    ...
</ContentPage>
Suggested: 5 reasons to choose .NET MAUI app development
.NET MAUI handler architecture
.NET MAUI provides another way of customizing controls using handlers. Developers can even customize renderers just the way they used to do in Xamarin. However, using handlers helps you escape a few hectic steps.
- It is easy to understand how the handlers are used to customize native controls. There is a set of methods that allows you to modify mappings to native controls before or after the mapping of properties. When you review the unit tests for the extension methods responsible for these modifications, you can discern the specific scenarios in which each method might be applied.
- “AppendToMapping” modifications done via this method will be run after an existing property mapping.
- “PrependToMapping” modifications done here will be run before an existing mapping.
- “ModifyMapping” modifies an existing mapping.
All these methods are called in a similar way, they just defer in the order in which our modifications are executed. Now, let’s explore the technical aspect. An introduction to .NET MAUI handlers won’t make any sense without a real example.
Create custom button
namespace MyFirstApp.Controls
{
    public class CustomButton : Button
    {
    }
}
Create custom handle
using Microsoft.Maui.Platform;
using MyFirstApp.Controls;

namespace MyFirstApp;
public partial class App : Application
{
	public App()
	{
		InitializeComponent();

		MainPage = new AppShell();
        Microsoft.Maui.Handlers.EntryHandler.Mapper.AppendToMapping("ColorButton", (handler, view) =>
        {
            if (view is CustomButton)
            {
#if ANDROID
               handler.PlatformView.SetBackgroundColor(Android.Graphics.Color.Red);

#elif iOS
               handler.PlatformView.BackgroundColor = Colors.Red.ToPlatform();
#endif
            }
        });
    }
}
Consume custom control
<?xml version="1.0" encoding="utf-8" ?>
<ContentPage xmlns="http://schemas.microsoft.com/dotnet/2021/maui"
             xmlns:x="http://schemas.microsoft.com/winfx/2009/xaml"
             xmlns:custom ="clr-namespace:MyFirstApp.Controls"
             x:Class="MyFirstApp.MainPage">
    <custom:CustomButton
                x:Name="CounterBtn"
                Text="Click me"
                SemanticProperties.Hint="Counts the number of times you click"
                Clicked="OnCounterClicked"
                HorizontalOptions="Center" />
</ContentPage>
MAUI handlers have made it easier to customize the controls. This block of code for handlers can even be written in platform specific file.
Most of the controls used on Xamarin.Forms, are still available in MAUI, with some added controls. In case of migration from Xamarin.Forms it gets easier to use all the existing controls. Let’s talk about Xamarin to MAUI migration.
Xamarin to .NET MAUI migration
Xamarin.Forms migration to MAUI can be done in 2 ways.
- Manual
- Assisted using .Net Upgrade Assistant
MANUAL: Manual process as name suggest refers to manually migrating each file of Xamarin project to MAUI by creating new MAUI project. This requires a lot of efforts but proves to be an essential way in case of complicated and large project.
In manual process, it’s better to have a complete understanding of project before starting migration.
Before migration, we must update your Xamarin.Forms platform projects to be SDK-style projects. SDK-style projects are the same project formats used by all .NET workloads, and compared to many Xamarin projects are much less verbose.
To migrate a Xamarin.Forms library project to a .NET MAUI library project, you must:
- Update your Xamarin.Forms app to use Xamarin.Forms 5.
- Update the app’s dependencies to the latest versions.
- Ensure the app still works.
- Update your project file to be SDK-style.
- Update namespaces.
- Address any API changes.
- Configure .NET MAUI.
- Upgrade or replace incompatible dependencies with .NET 7+ versions.
- Compile and test your app.
To simplify the upgrade process, you should create a new .NET MAUI library project of the same name as your Xamarin.Forms library project, and then copy in your code.
.NET Upgrade Assistant: The .NET Upgrade Assistant helps you upgrade Xamarin.Forms projects to .NET Multi-platform App UI (.NET MAUI) by converting the solution’s project file and by performing common code updates. Specifically, the tool will:
- Convert the Xamarin.Forms class library project, Xamarin.iOS project and Xamarin.Android project to SDK-style projects.
- Update the target framework in project files to net7.0-android and net7.0-ios, as required.
- Set true in project files.
- Add additional project properties and remove project properties that aren’t required.
- Add and remove specific NuGet packages:
- Remove the Xamarin.Forms and Xamarin.Essentials NuGet packages.
- Replace the Xamarin.CommunityToolkit NuGet package with the .NET MAUI Community Toolkit NuGet package.
- Replace Xamarin.Forms compatible versions of the SkiaSharp NuGet packages with .NET MAUI compatible versions, if used.
- Remove references to the Xamarin.Essentials namespace, and replace the Xamarin.Forms namespace with the Microsoft.Maui and Microsoft.Maui.Controls namespaces.
.NET Upgrade Assistant will prompt you for the type of upgrade to perform:
- In-place: This option upgrades your project without making a copy.
- Side-by-side: This option copies your project and upgrades the copy, leaving the original project alone. Currently, a .NET MAUI side-by-side upgrade requires the creation of new projects to upgrade each project head. Attempting to upgrade a project head into an existing project will likely cause errors and is not a supported experience at this time.
Upgrade with the Visual Studio extension
The .NET Upgrade Assistant can be installed as a Visual Studio extension or as a .NET command-line tool with below methods.
1. With Visual Studio opened, press the Extensions > Manage Extensions menu item, which opens the Manage Extensions window.
2. In the Manage Extensions window, enter upgrade into the search input box.
3. Select the .NET Upgrade Assistant item, and then select Download

Once the extension has been downloaded, close Visual Studio. This starts the installation of the extension:
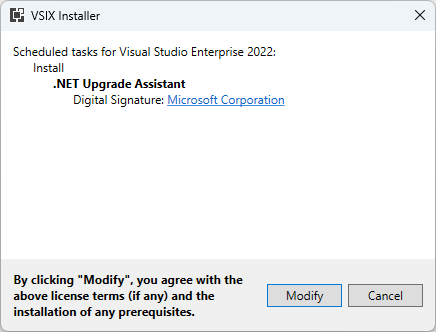
Select Modify and follow the directions to install the extension.
After installation, right-click on the project in the Solution Explorer window and select Upgrade.
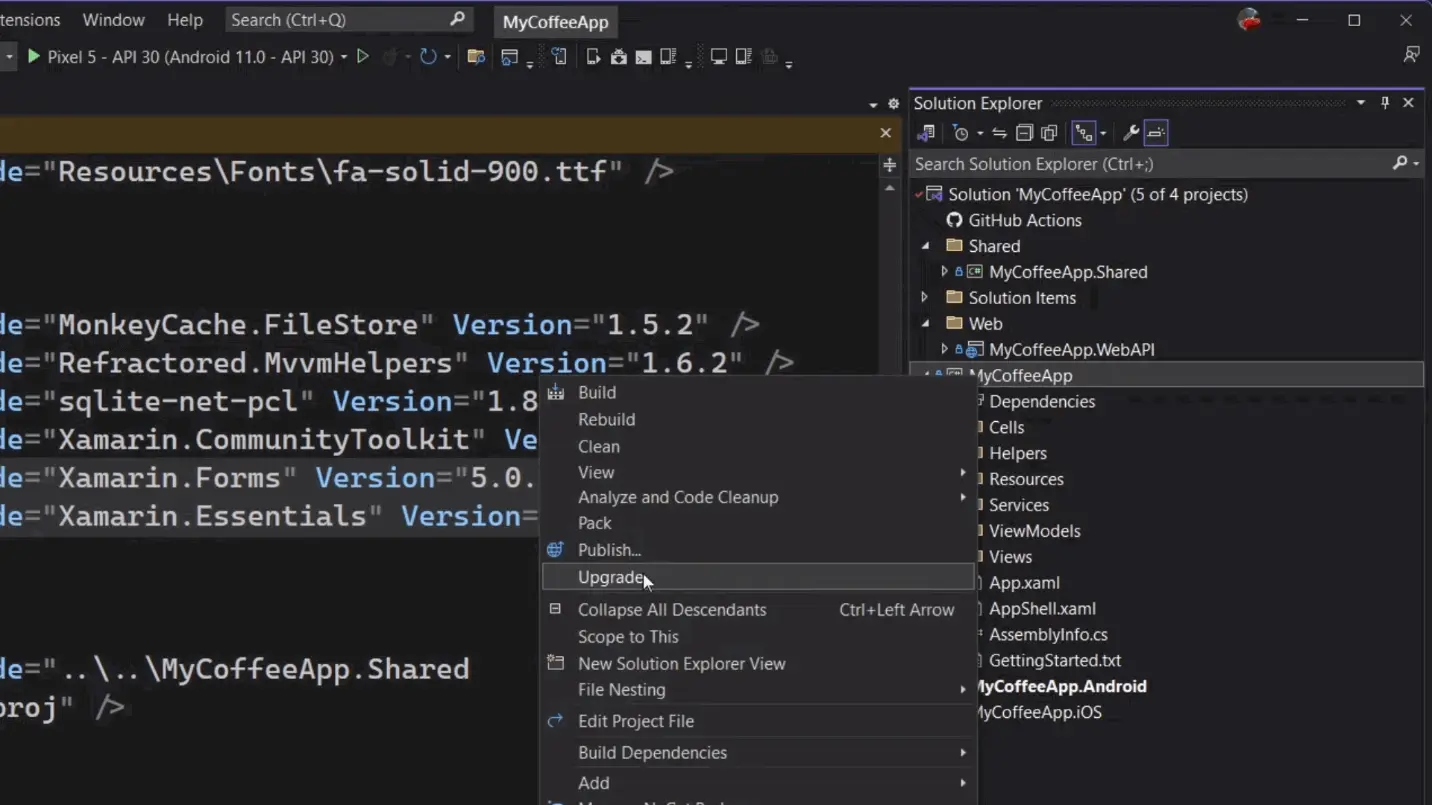
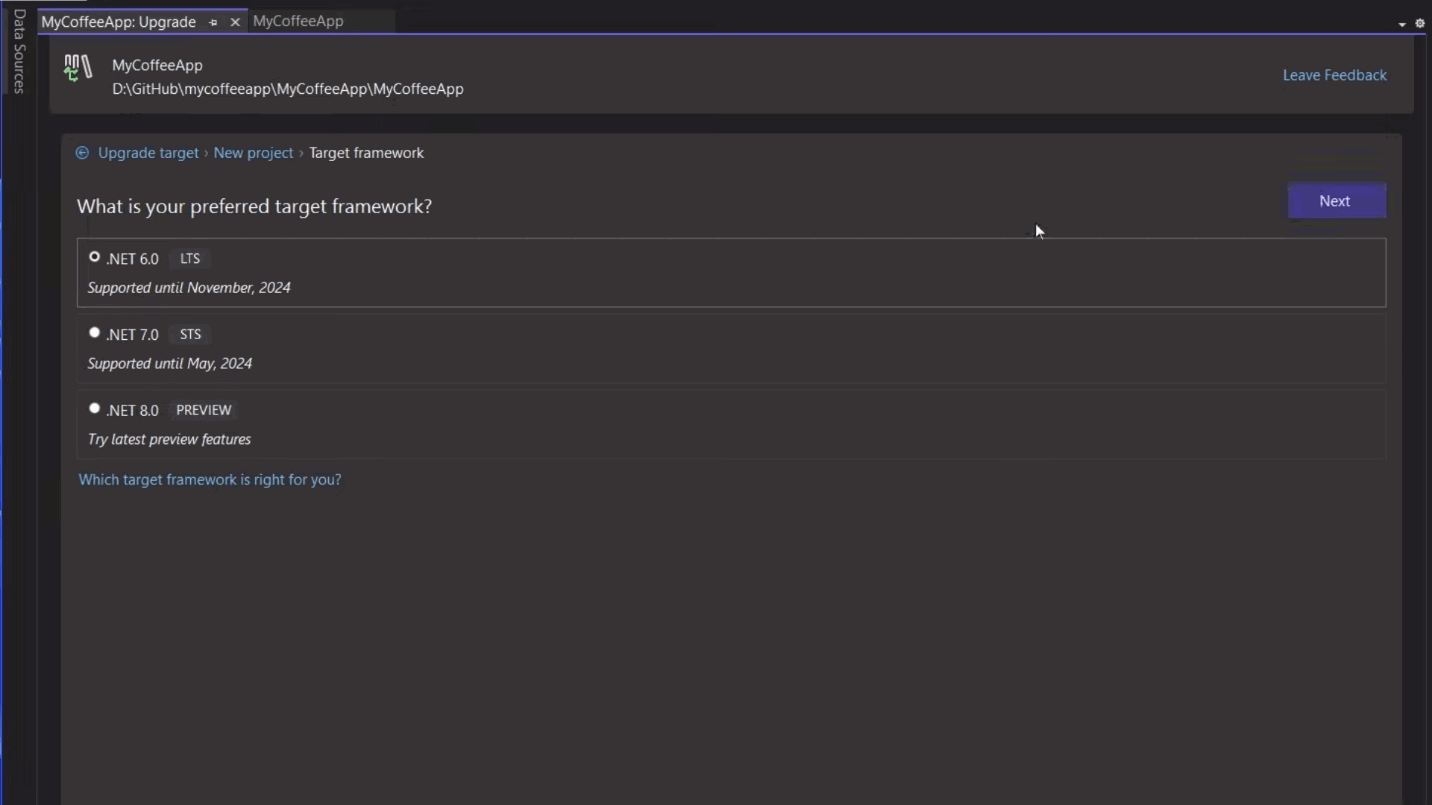
A tab that offers various upgrade styles based on your project type is opened.:
- In-place project upgrade
- This option upgrades your project without making a copy
- Side-by-side project upgrade
- Copies your project and upgrades the copy, leaving your original project alone
- Side-by-side incremental
- This mode lets you slowly upgrade your application piece-by-piece


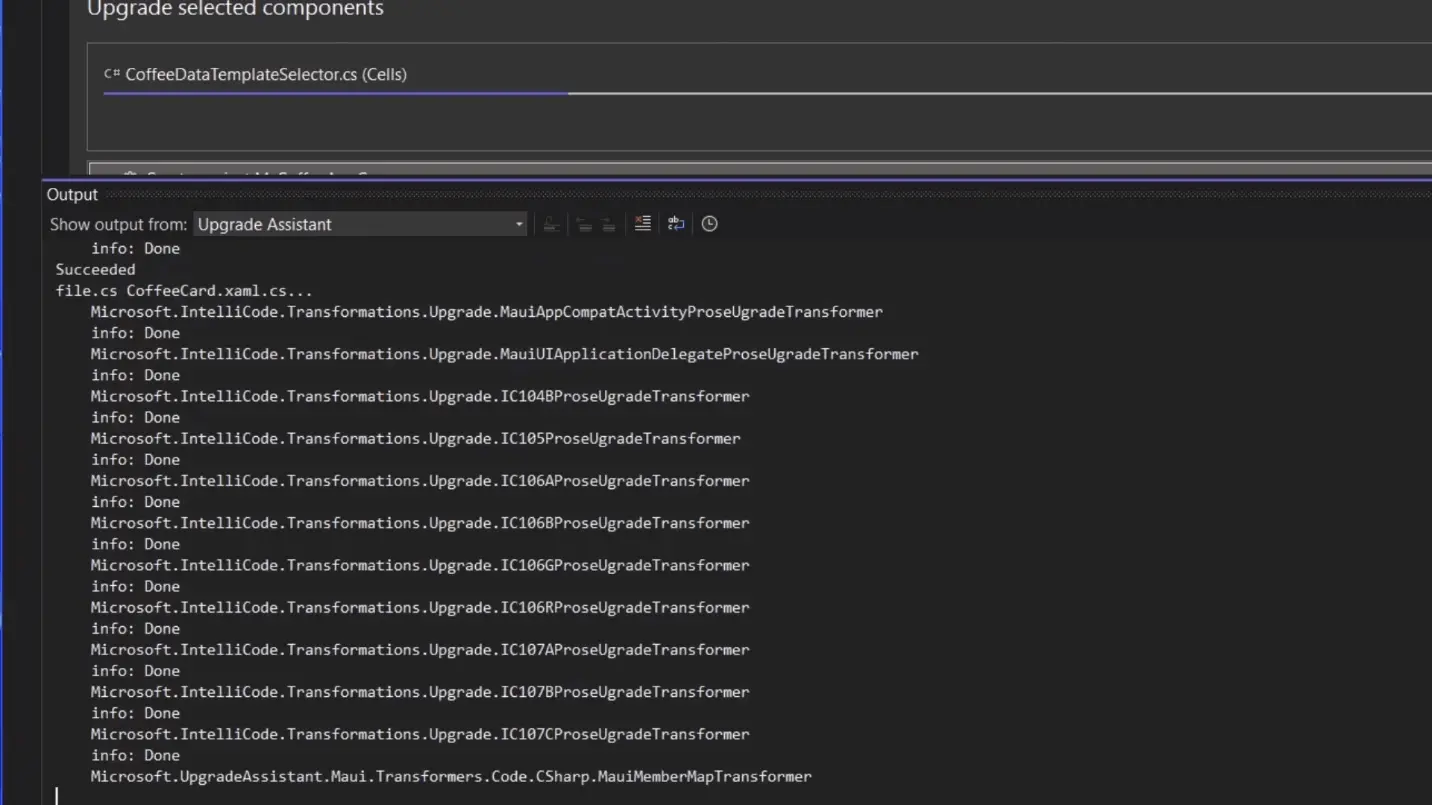
The actions that the Upgrade Assistant performs are logged to the Output window under the Upgrade Assistant source, as shown in the following image:
Once your app has been upgraded, a status screen that shows all the artifacts related to your project that were associated with the upgrade is displayed. Each upgrade artifact can be expanded to read more information about the status. The following list describes the status icons:
- Filled green checkmark: The artifact was upgraded and completed successfully.
- Unfilled green checkmark: The tool didn’t find anything about the artifact to upgrade.
- Yellow warning sign: The artifact was upgraded, but there’s important information you should consider.
- Red X: The artifact was to be upgraded, but the upgrade failed.
After upgrading your project, you’ll need to test it thoroughly and resolve any dependencies in case missed, or third-party integration changed for latest .NET standards.
Upgrade with the CLI tool
We can even install it using command line tool using the command given below:
dotnet tool update -g upgrade-assistant
After installation follow the steps given below:
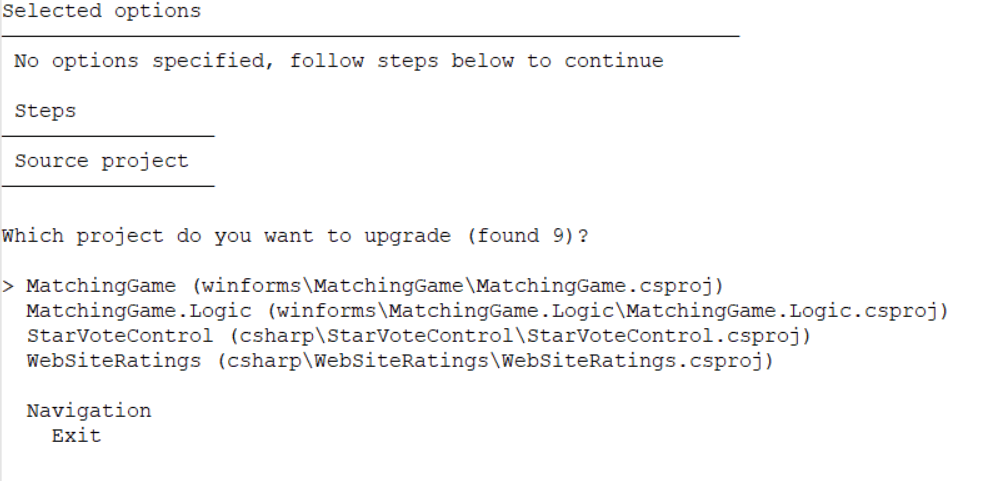
Run the tool with the upgrade-assistant upgrade command, all projects from the current and sub folders. The CLI tool provides an interactive way of choosing which project to upgrade.
Use the arrow keys to select an item and press Enter to run the item. Select the project you want to upgrade. In the example provided in this article, there are four projects under the current folder:
Depending on the project you upgrade, you may be presented with an option to specify how the upgrade should proceed:
- In-place project upgrade
- This option upgrades your project without making a copy
- Side-by-side project upgrade
- This option is only available for .NET Framework projects. It copies your project and upgrades the copy, leaving your original project alone

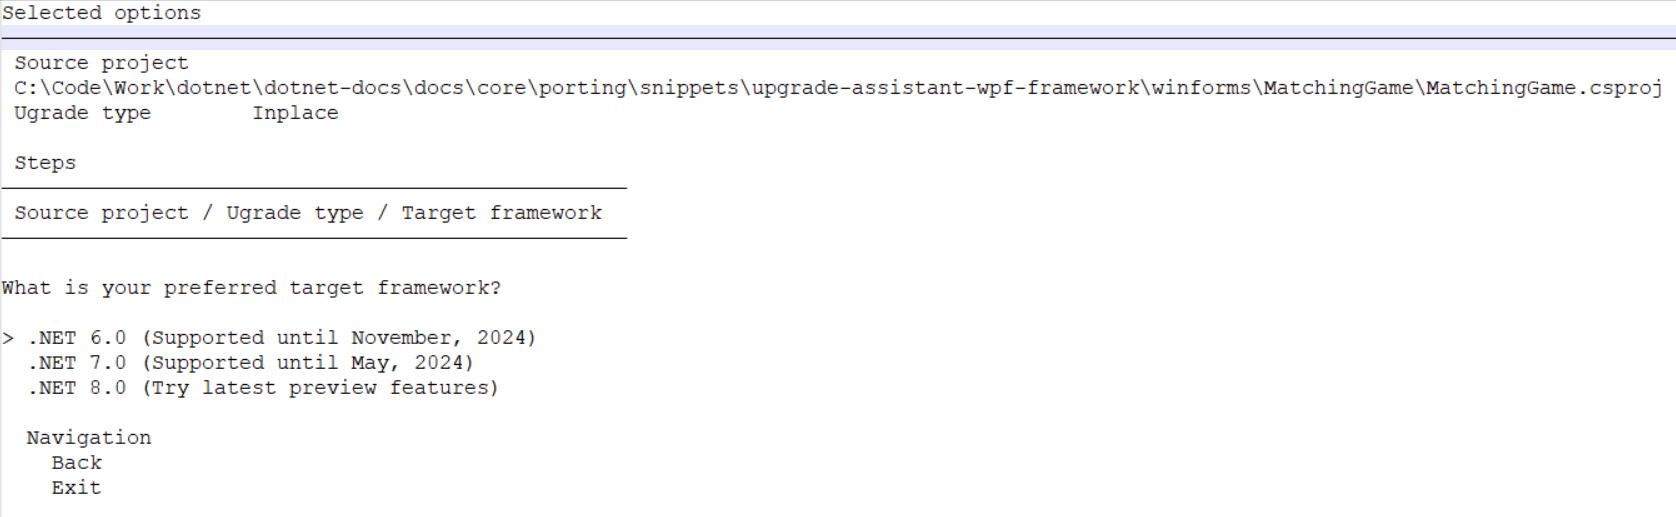
After this step, if there’s more than one upgradable target framework, you’ll have to choose a target:
Just like in the Visual Studio method, after upgrading your project, you should perform thorough testing and address any missed dependencies or changes in third-party integrations due to the latest .NET standards.
Conclusion
Xamarin to MAUI migration can be a tedious task, but with the right tools and resources, it can be a smooth process. In this blog post, we have covered the key steps involved in migrating to MAUI, as well as some of the challenges you may face and how to overcome them.
If you are considering migrating to MAUI, we encourage you to start planning early and to assess your existing codebase carefully. With the right planning and execution, you can migrate to MAUI and start building the next generation of cross-platform apps with confidence.
If you are planning to migrate to .NET MAUI and are confused about how to kickstart, contact our .NET MAUI developers.
Co-author: Anshita Solanki